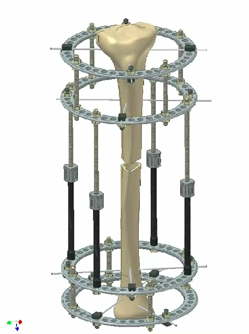
 This will be a complete step by step explanation of how the original ilizarov method and device was used to increase patients limbs. Remember that the soviet orthopedic surgeon was only intending to use it to help people with pathologies like stunted limbs so that they can live a more normal life. I wanted to post a picture to the right of the beginning of this post to show what exactly are the benefits and the liabilities of using the external fixator ilizarov method. It is noted right now that the picture shown on the right was taken from a Video I saw on Youtube, specifically entitled “Finite Element Analysis of Ilizarov External Fixator” which is located HERE. The pictures is not mine, but seems to come from a presentation given by the School of Mechanical, Aerospace, and Civil Engineering at the University of Manchester.
From Youtube Video from HERE is named “Beauty” which was on Season 7 Episode 1 of National Geocraphic’s website series called “Taboo”, from time range 15:00-25:00.
Everyday the bones are pulled apart so that they grow longer as they heal. The patient was named Margarita Rosam(n)ova gained about inch or slightly more, I guess 3-4 cm more in height). The surgery was performed by Dr. Constantin Navukov (spelling?) . It was done at the Illarov Clinic located in Kurgan of Siberia. The procedure was stated to cost $26,000 and the complications are infection, disability, and maybe also amputation. This type of surgery, as in all other types of surgery, there is no complete guarantee of success.
Note: during the entire operation, the patient of course will be put under with the strongest possible painkillers. If they don’t do that, the surgeons you choose to use may not be the best quality.
0. The patient is wheeled into the operations room where the usually team of surgeons and anesthesiologists will be. Their lower legs are first shaved of all hair to keep the operated on areas smooth. The lower legs are then dabbed/swabbed with alcohol for infection protection reasons. Then the operation really begins.
1. First, long wire metal spokes are drilled into the patient’s leg with an electric power drill. The area and bone which is almost always worked on is the lower leg part where the tibia and fibula are. The metal spokes go right through the bone and protrude from the skin onto the opposite side. This process of making holes is called perforation. The holes will make allow the surgeons to manufacture the fracture and achieve the results they want.
2. Each spoke is attached to either the top or bottom of the patient’s tibia or fibula bones. If they are not placed in the utmost precision, they might damage tissue or nerves. Usually there will be around 8-12 long metal spokes drilled through the two entire long bones, tibia and fibula. The spokes are first drilled in one direction, and the next one is drilled in another direction, about 60-90 degrees away from the first spoke. The exact location and direction on where to drill the thin metal spokes/ rods are really based on the human anatomy and bone positioning, which I don’t know at this time. I would assume any orthopedic surgeon would know EXACTLY what are the exact areas to drill into.
 3. 3 of the spokes are usually drilled to the top of the tibia, 2, spokes drilled around the upper middle area of the tibia, and 2 are drilled around the lower middle area of the lower leg bones, and 3 spokes are drilled to the bottom of the tibia. Again, the exact location and direction of on how and where the spokes are drilled are not know to me at this time. I would assume there must be at least 2 spokes that also go through the fibula as well so that the fibula can extend too but I am not sure about that part. I am not sure about the exact number of spokes/drills there are supposed to be. In some videos and pictures I see less spokes used like around 8 and in others I see a lot more like around 12.
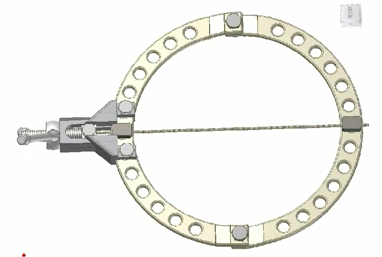
4. The surgeons then attach a metal brace called the Ilizarov frame, which is just two semicircular shaped metal pieces together, attaching the ends of the two pieces to form a thin circular ring which is about 2-3 mm thick and has a radial thickness of about 1 cm. In the metal semicircles, there are many holes on it equidistance positioned away from each other. The reason for the holes are for the poles and nuts to eventually go. Screw bolts or nuts or studs are used to close the ends.. The important thing is that the method allows the surgeons to keep all of the pieces and vitally important structures intact.
There is usually 8 semicircle metal pieces, that attach together to form 4 metal circles that will hold the spokes together and hold the legs into place.
5. The spokes are pruned at the ends for equal distance protruding from the leg. A rather larger piece of round plastic is pushing into the spokes, on both ends right next to there bone proferations are so they can hold the spokes into position. a piece of plastic goes right next to each bone/ skin protraction of spoke. The spokes is somehow attached to the circular metals by passing the thin spokes which look just like thick strong metal wires through a piece of strong plastic that is attached to the metal circle using screws which go through the holes.
 The metal circles are then attached to each other through long and super long rod shaped screws. The shorter length screws are used to attach the circles on the edge of the lower leg regions to the circles closer to the middle. The really long rod shaped screws are the ones that hold the middle circles together. Of course, the ends of all screws are assumed to held into place with either strong plastic or lug nuts or bolts. If you can not picture what I am saying at this time, refer to the picture on the right.
6. With the frame in place, the surgeon then takes a chisel and a hammer. The chisel is inserted into the skin until it reaches contact with bone. While holding the chisel with one hand very steadily to one specific area in the tibia, the other hand swings the hammer at the tibia at a relatively strong force, in a tapping motion. The chisel acts similarly like a railway spike.
7. To avoid damaging the marrow in the inter medullary cavity, another surgeon works on the bone from the opposite side. The hammering in a steady but firm and strong tapping rate goes on usually for about 10 minutes until the chisel has made a clear fracture in the tibia, but only for the outer cortical bone area, not the inner cancellous (trabecular) bone part which should still be intact holding the marrow inside.
8. To check to make sure the proper fracture is made, the surgeons then get an X-Ray of the just operated on tibia bone. They want to make sure that both bones, the tibia and fibula are fractured.
9. Over the next few months in the futures, the gaps or fractures will be incrementally widened by turning screws on the long poles that have been used to hold the inner metal circularly frames together. As the 4 screws are turned, the 4 poles used to hold circles together fixed in place will grow and extend longer. The bones will then grow longer to fill the gap.
10. The patient will be bed ridden for at least 4 months. The surgeons will come by on a regular basis to check up on the patient and to take measurements of the leg that is being lengthened. a baseline measurement of the leg is made. The frame will be slowly stretched. Usually the rods have only a set maximum amount of extension lengthening that is possible. Once the set lengthening is reached, the frames can be removed.
Eventually, the Frames are removed after about 4-6 months. The spokes are taken out. There is still a lot of physical therapy that needs to be done. The newly formed leg bones may not be strong enough to hold up the patient so it takes a while. Since the spokes are pushing through the skin, the gradual lengthening and stretching of the bone also will touch the nerves and cause excruciating pain. The bone stretching may also tear the skin leaving scar marks.

Does the Ilizarov method reduce athletic ability? I’d like to be taller but I don’t want to permanently harm my bones.
Pingback: Complete List Of Posts - |
Pingback: A Complete Guide To Limb Lengthening Surgery